
Autocad: Linetype Generation Enable or Disable
Just to show you the use of underrated "linetype generation" in properties of polyline when enabled or disabled.

AutoCad: Work on 2D UCS instead of 3D

If most of your work is in 2D, best practice is to change the default UCS Icon to 2D. This is beneficial when you are pasting to original coordinates as it shows that your are on World UCS, here's how;
1. Use command UCSICON;
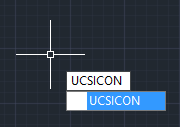
2. Select Properties;

3. Under UCS icon style, select 2D;

4. Click OK to close;
5. Now your UCS icon will look like this;

Related commands SHADEMODE, UCS;P (previous), UCS;E (entity), UCS;V (viewpoint)
End
Revit: How to Sort Your Browser Organization
- Open your project;
- Right click on Browser Views;
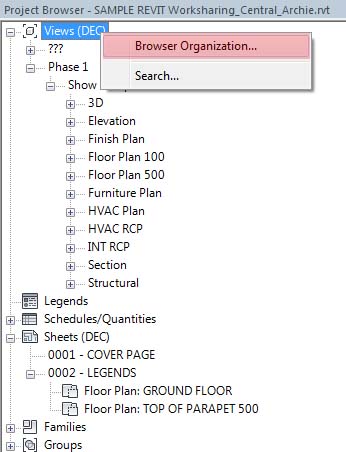
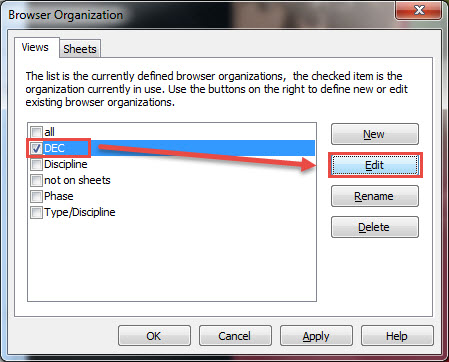
- Under Views tab click the browser organization you want to sort;
- Under Grouping and Sorting tab follow the image instruction below;
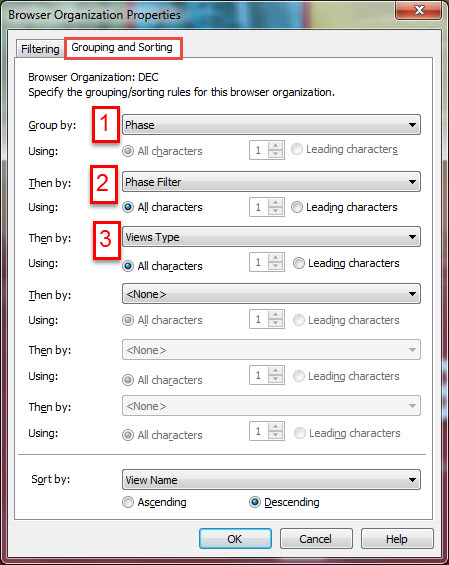
- If you cannot find the "View Types" option, it is because i have added it on my project parameters;
- to add View parameters, on your ribbon bar click on "Manage" and click on toolbar "Project Parameters"
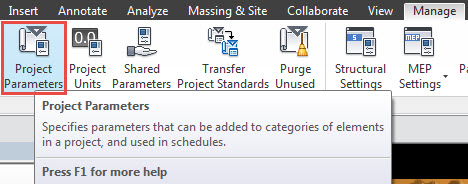
- then click option "Add" on the right side of dialog box
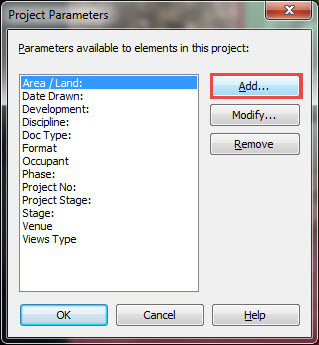
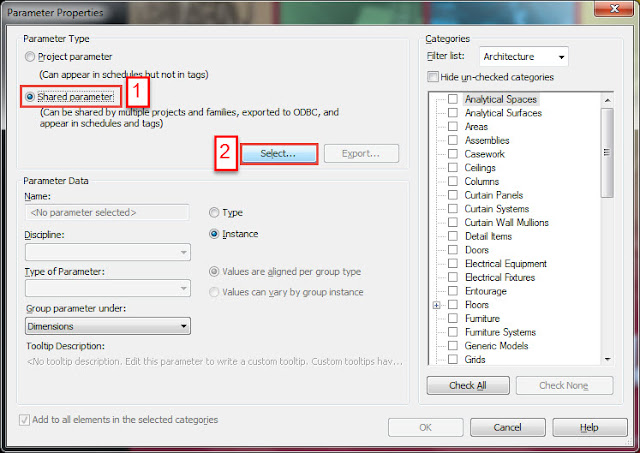
- if you already have it in your "Shared Parameters" select from it, otherwise select "Project Parameter", follow instruction below;
- Name it "Views Type" or other name you want;
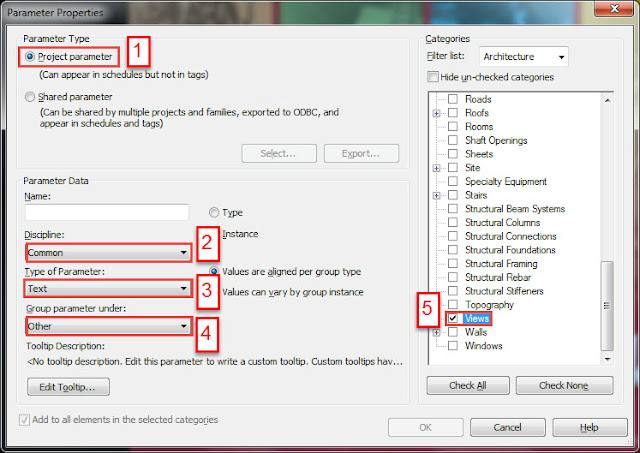
- click "OK" when done and continue on "Grouping and Sorting".
- Right click on Browser Views;
- Under Views tab click the browser organization you want to sort;
- Under Grouping and Sorting tab follow the image instruction below;
- If you cannot find the "View Types" option, it is because i have added it on my project parameters;
- to add View parameters, on your ribbon bar click on "Manage" and click on toolbar "Project Parameters"
- then click option "Add" on the right side of dialog box
- if you already have it in your "Shared Parameters" select from it, otherwise select "Project Parameter", follow instruction below;

- Name it "Views Type" or other name you want;
- click "OK" when done and continue on "Grouping and Sorting".
FIN
Quick Virus Check Manually in Temp Folder
If you do not have any anti virus you can quickly check your temp folder if there are any unknown exe file that is present in that folder. Here, I used a free Search-Program called "Everything" to search on my C:\Users\yourusername\AppData\Local\Temp\ for any unknown executable file.
Using a command "folder-name" then "\" then ".exe" it will match your query with the path and the file-type.

Gladly, the exe file came up in the result is familiar to me. You shouldn't have any exe file in your temp folder unknown to you unless you have run or download it. I am not an IT or computer engineer but this is the basic thing I always look at.

Gladly, the exe file came up in the result is familiar to me. You shouldn't have any exe file in your temp folder unknown to you unless you have run or download it. I am not an IT or computer engineer but this is the basic thing I always look at.
Move Files Based on Its Filename
This workaround will help you sort your files based on string on its filename. Also this is the second part of my post HowTo Sort Your Movie Collection By Genre.
I have some movies that I have added genre on its filename and I want to move this to its genre-folder.

You might say, type the string on the search box and cut paste to the folder, easy.

I have some movies that I have added genre on its filename and I want to move this to its genre-folder.

You might say, type the string on the search box and cut paste to the folder, easy.

But what if you have alpha-numeric in your filename, like for example your files are named with date at the end and you wanted to sort it by year then month-day folder, etc. This where Advance Renamer come in handy.
Download and install the free program called “Advance Renamer”.
After installation run the program and you should see like this;

Now drag all the files you wanted to sort on the grid area. In my example below I highlighted the five steps you need to set.
1. Drag all the files you wanted to sort.
2. Add Method –click add method and Select New Name.
3. Under New Name method type <Name>.
4.On batch mode option, click pull-down menu and select Move.
5. Set output folder where your folders are or where you want Advance Renamer create a new folder.

Then, once you have followed all the steps above, add <Substr:,:18> in addition to your output folder (refer to image above).
Let’s see what this command or code means, according to Advance Renamer website, which you could read from this link.

In my case, for example, the filename is Movie Name (2011),Drama.mp4, now start from comma “,” I will take the text “Drama” create a folder and move this file to the folder created. So if the comma in my filename is at before the year, for example Movie Name ,(2011)Drama.mp4 the folder that it will create will be (2011)Drama
Now the number 18 on the text that I have added is the number of text that it will copy to create a folder. For example, the same filename Movie Name (2011),Drama.mp4 if I change the 18 to 4, the folder name will be Dram. If I changed it to 5 it will be Drama and 6 will still Drama.
Finally, if you have set all the parameters that suits your needs, click on Test Batch and see if there is an error then Start Batch

You can undo the command by clicking Undo Last Batch and select from the list.
Download and install the free program called “Advance Renamer”.
After installation run the program and you should see like this;

Now drag all the files you wanted to sort on the grid area. In my example below I highlighted the five steps you need to set.
1. Drag all the files you wanted to sort.
2. Add Method –click add method and Select New Name.
3. Under New Name method type <Name>.
4.On batch mode option, click pull-down menu and select Move.
5. Set output folder where your folders are or where you want Advance Renamer create a new folder.

Then, once you have followed all the steps above, add <Substr:,:18> in addition to your output folder (refer to image above).
Let’s see what this command or code means, according to Advance Renamer website, which you could read from this link.

In my case, for example, the filename is Movie Name (2011),Drama.mp4, now start from comma “,” I will take the text “Drama” create a folder and move this file to the folder created. So if the comma in my filename is at before the year, for example Movie Name ,(2011)Drama.mp4 the folder that it will create will be (2011)Drama
Now the number 18 on the text that I have added is the number of text that it will copy to create a folder. For example, the same filename Movie Name (2011),Drama.mp4 if I change the 18 to 4, the folder name will be Dram. If I changed it to 5 it will be Drama and 6 will still Drama.
Finally, if you have set all the parameters that suits your needs, click on Test Batch and see if there is an error then Start Batch

You can undo the command by clicking Undo Last Batch and select from the list.
END
AutoCad Reset Settings & Uninstall Feature
This comes very handy if your working AutoCad program that suddenly do not work as it supposed to be. Instead of reinstalling it like your old school IT suggested, inform them that there is a feature that reset your AutoCad program to revert back to its original default settings like a freshly-installed one. Or better yet, do it yourself if there is no required administrative access etc.
Click “Start”, “All Programs”, “Autodesk” and search for your AutoCad version then click on “Reset Settings to Default”
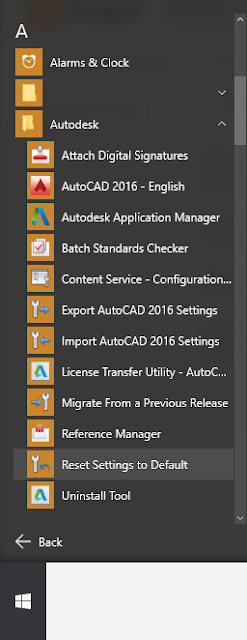
Also, uninstalling your installed Autodesk product is quite easy with Uninstall Tool. Under the same folder “Autodesk” in Start Menu, select “Uninstall"
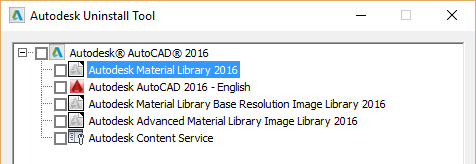
You can uninstall more than one program by selecting each on the check box and click “Uninstall”, click “Exit” when finish.
END
Click “Start”, “All Programs”, “Autodesk” and search for your AutoCad version then click on “Reset Settings to Default”

Also, uninstalling your installed Autodesk product is quite easy with Uninstall Tool. Under the same folder “Autodesk” in Start Menu, select “Uninstall"
You can uninstall more than one program by selecting each on the check box and click “Uninstall”, click “Exit” when finish.
END
Subscribe to:
Posts (Atom)